
WordPress新的Gutenberg编辑器是一个完全使用现代前端技术打造的编辑器。WordPress4.7引入的Rest API就奠定了WordPress的野心,Gutenberg也基于此技术。从前端的大潮流来看,经典编辑器使用的旧技术势必会被历史淘汰。
Gutenberg从目前的进展来看,它包含了Block、Format、Sidebar三个部分。由于Gutenberg的开发很少有中文原创教程或心得,因此我便在博客中做了一些分享。例如之前分享过Block模块的创建方法: https://www.wpdaxue.com/how-to-creat-custom-block-type-in-gutenberg.html
Format是什么
Format顾名思义就是格式,它是在Gutenberg编辑器中的格式化工具。如段落上方的“对齐”、“加粗”等按钮:

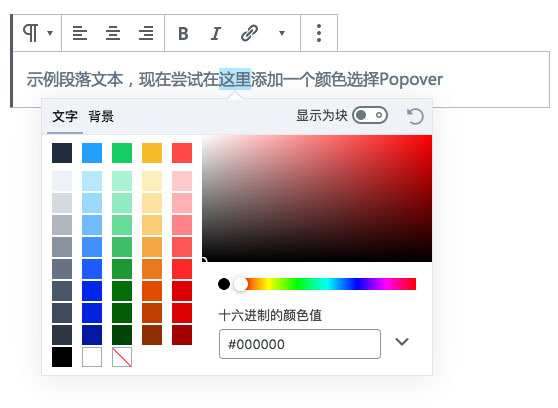
Format创建方法官方文档用ES5已经写得非常详细了,我这里不再重复。今天主要想分享的是:如何在Format中添加一个跟随已选文本的Popover,并在里面做相关的设置。例如做一个文本色彩选择器:
特别需要注意的是:这样的一个写法并非是我凭空杜撰,WordPress官方其实是有示例的,本文参考并致敬了“超链接”这个Format。
编写一个Format
PHP部分
PHP的部分和Block的创建方法基本是一致的:大致逻辑是注册一个脚本,在Block编辑器的钩子上将脚本引入。
<?php
function register_pandastudio_block_format_mark() {
	wp_register_script(
		'pandastudio-block-format-mark-js',
		//根据实际位置引入文件
		get_stylesheet_directory_uri().'/pandastudio_plugins/format_mark/block.build.js',
		array( 'wp-rich-text' )
	);
}
add_action( 'init', 'register_pandastudio_block_format_mark' );
function register_pandastudio_block_format_mark_enqueue_assets_editor() {
	wp_enqueue_script( 'pandastudio-block-format-mark-js' );
}
add_action( 'enqueue_block_editor_assets', 'register_pandastudio_block_format_mark_enqueue_assets_editor' );
还可根据实际场景需要引入css文件,这里就不做示例了。引入js文件的时候注意一下编译后的文件位置。
Javascript部分
在WordPress的官方文章中,Format的示例教程是一个使用ES5开发出来的教程,对于功能复杂的场景,编写过程会变得异常繁琐,而且不便于人类阅读。因此本文中我将做一个ES Next的开发示例。
注册 Format 的方法是提供在 wp.richText 里面的,引入后即可使用。注册一个 Format 基本结构是:
const {
	registerFormatType,
} = wp.richText;

registerFormatType( 'pandastudio/mark', {
	title: '标记',
	tagName: 'span',
	className: 'pandastudio-mark',
	attributes: {
		style: 'style',
		block: 'inline-block'
	},
	edit(){
		//...
	}
} );
由于我们的目的是点击按钮后,弹出一个Popover,而Popover有一个“显示”和“未显示”的状态需要存储。通过修改数据来控制Popover的显示。而这个状态数据在Format中默认是没有办法存储的!因此,我们必须将edit方法扩展一下:
...
edit: class markEdit extends Component {
	constructor() {
		super( ...arguments );
		this.state = {
			modal_visibility: false,
		};
	}
	render() {
		//...
	}
}
...
现在,我们有了一个 state 来存储状态,并且将 Popover 的显示状态存储在了 modal_visibility 中。接下来我们需要:
- 当用户选择了文本之后,这个 Format 按钮才可用,否则是灰色不可用状态。因此创建了一个
words_selected方法来进行判断 - 对于 Popover,需要定位,查看 Popover 的文档说明可以注意到有一个叫做 anchorRect 的参数,因此编写一个
set_popover_rect方法来创建 anchorRect 并存储到 state 中,并在 Popover 的参数中读取它 - 在 Format 按钮点击后,修改 state 中的 modal_visibility 为 true 来显示 popover,并同时读取当前的选中位置来创建 anchorRect 给 Popover 定位
- 在点击 Popover 的外部后,通过修改 state 中的 modal_visibility 为 false 来关闭Popover
const { getRectangleFromRange } = wp.dom;
const { RichTextToolbarButton } = wp.editor;
const { Popover } = wp.components;
const { Fragment } = wp.element;
...
edit: class markEdit extends Component {
	constructor() {
		super( ...arguments );
		this.show_modal = this.show_modal.bind( this );
		this.close_modal = this.close_modal.bind( this );
		this.words_selected = this.words_selected.bind( this );
		this.set_popover_rect = this.set_popover_rect.bind( this );
		this.state = {
			modal_visibility: false,
		};
	}
	words_selected() {
		const { value } = this.props;
		return value.start !== value.end;
	}
	set_popover_rect() {
		const selection = window.getSelection();
		const range = selection.rangeCount > 0 ? selection.getRangeAt( 0 ) : null;
		var rectangle = getRectangleFromRange( range );
		this.setState( { popover_rect: rectangle } );
	}
	show_modal() {
		this.setState( { modal_visibility: true } );
		this.set_popover_rect();
	}
	close_modal() {
		this.setState( { modal_visibility: false } );
	}
	render() {
		let {
			isActive
		} = this.props;
		return (
			<Fragment>
				<RichTextToolbarButton
				icon='editor-code'
				title="标记"
				onClick={ this.show_modal }
				isActive={ isActive }
				isDisabled={ !this.words_selected() }
				/>
				{ this.state.modal_visibility && (
					<Popover
					anchorRect = { this.state.popover_rect }
					position = "bottom center"
					className = "pandastudio_mark_popover"
					onClickOutside = { this.close_modal }
					>
					Popover内容
					</Popover>
				)}
			</Fragment>
		);
	}
}
...需要注意的是,在set_popover_rect方法中使用到了另一个getRectangleFromRange方法,这个方法是 WordPress 在 wp.dom 中提供的,需要先引入。其他组件的引入我这里就不在多说了,详见WordPress文档即可。
这样,一个 Format 和 Popover 融合的框架就完成了。当Popover弹出后需要操作的其他事情,就可以在Popover的内容中去添加事件方法了。
总结
这个示例中,主要有两个部分需要注意:
- 注册 Format 的方法中 edit 参数需要扩展才可以存储状态数据
- Popover的定位方法使用了 wp.dom.getRectangleFromRange 并传入了已选文本的位置参数,这是难点。这个方法 WordPress 官方没有文档描述,我也不是凭空找到的,此处致敬了“超链接”的编写方法
参考文献
- WordPress Block编辑器手册 – Introduction to the Format API
- WordPress Block编辑器手册 – Popover
- WordPress Gutenberg Github
注:本文原创出自 http://panda.panda-studio.cn/how-to-creat-custom-format-type-in-gutenberg ,转载请注明该出处!