从我从头创建一个新的WordPress插件已有一段时间了,但是最近我决定将一些仅对我有用的代码转换为可以分发的完整插件。该过程的一部分涉及用插件的未来用户可以设置的选项替换硬编码数据。
我需要在插件中创建一个设置页面,我发现自己想知道在瞬息万变的WordPress世界中,最新、最好的方法是什么。让我们看一下将设置选项页面添加到WordPress插件的各种方法。
- WordPress设定API
- 自定义字段框架
- 使用代码生成器
- 使用REST API
- VueJS
- React
WordPress设置API
WordPress 设置API是在WordPress 2.7引入的,允许开发人员在仪表板设置页面添加新的字段,或创建新的设置字段。WordPress会智能地显示并采取保存数据:
它使您可以定义设置页面,修改这些页面中的部分以及这些部分中的字段。
这是本文中讨论的方法中最手动的方法,但是值得了解它的工作方式,在某些情况下,这是一种可能非常简单的方法。
首先,我们需要注册一个新的菜单项和页面,其中将包含我们的设置表单。让我们在WordPress仪表板的“设置”顶级菜单项下添加页面:
<?php

function dbi_add_settings_page() {
    add_options_page( 'Example plugin page', 'Example Plugin Menu', 'manage_options', 'dbi-example-plugin', 'dbi_render_plugin_settings_page' );
}
add_action( 'admin_menu', 'dbi_add_settings_page' ); 第五个参数add_options_page是用于显示页面内容的函数的名称,它将用于输出设置表单。该函数需要有一个表单元素和一些函数调用才能与设置API进行通信:
<?php

function dbi_render_plugin_settings_page() {
    ?>
    <h2>Example Plugin Settings</h2>
    <form action="options.php" method="post">
        <?php
        settings_fields( 'dbi_example_plugin_options' );
        do_settings_sections( 'dbi_example_plugin' ); ?>
        <input name="submit" class="button button-primary" type="submit" value="<?php esc_attr_e( 'Save' ); ?>" />
    </form>
    <?php
}函数settings_fields呈现代码以告知表单要执行的操作,以及隐藏输入以使用nonce使其安全。传递给函数的参数是设置组的名称,该名称将在以后注册。
函数do_settings_sections是表单的关键部分,在这里输出所有部分和字段(文本框、选择框、复选框等),以便用户可以输入数据。同样,该函数参数是任意的,但必须是唯一的。我们将在注册字段时使用它。
让我们这样做:
<?php

function dbi_register_settings() {
    register_setting( 'dbi_example_plugin_options', 'dbi_example_plugin_options', 'dbi_example_plugin_options_validate' );
    add_settings_section( 'api_settings', 'API Settings', 'dbi_plugin_section_text', 'dbi_example_plugin' );

    add_settings_field( 'dbi_plugin_setting_api_key', 'API Key', 'dbi_plugin_setting_api_key', 'dbi_example_plugin', 'api_settings' );
    add_settings_field( 'dbi_plugin_setting_results_limit', 'Results Limit', 'dbi_plugin_setting_results_limit', 'dbi_example_plugin', 'api_settings' );
    add_settings_field( 'dbi_plugin_setting_start_date', 'Start Date', 'dbi_plugin_setting_start_date', 'dbi_example_plugin', 'api_settings' );
}
add_action( 'admin_init', 'dbi_register_settings' );
这里发生了三件事。首先,我们使用 register_setting为我们的设置在wp_options表中创建新记录,其中’dbi_example_plugin_options‘作为option_name。
我们的个人设置将存储为序列化的数据数组。这非常适合将我们所有的插件设置集中在一个地方,但是,除非正确处理,否则数据序列化在迁移WordPress数据库时可能会导致问题。第三个参数是函数的名称,该函数处理在保存选项时验证输入的数据。
例如,确保API密钥是一个仅包含数字和字母的32字符串:
<?php

function dbi_example_plugin_options_validate( $input ) {
    $newinput['api_key'] = trim( $input['api_key'] );
    if ( ! preg_match( '/^[a-z0-9]{32}$/i', $newinput['api_key'] ) ) {
        $newinput['api_key'] = '';
    }

    return $newinput;
}其次,我们正在注册一个与选项绑定的组部分。最后,我们使用 add_settings_field 来为该组注册三个字段。所有这些都是用于保存插件设置的文本字段。
接下来,我们需要创建函数以显示该部分的有用文本并在表单上呈现字段:
<?php

function dbi_plugin_section_text() {
    echo '<p>Here you can set all the options for using the API</p>';
}

function dbi_plugin_setting_api_key() {
    $options = get_option( 'dbi_example_plugin_options' );
    echo "<input id='dbi_plugin_setting_api_key' name='dbi_example_plugin_options[api_key]' type='text' value='{esc_attr( $options['api_key'] )}' />";
}

function dbi_plugin_setting_results_limit() {
    $options = get_option( 'dbi_example_plugin_options' );
    echo "<input id='dbi_plugin_setting_results_limit' name='dbi_example_plugin_options[results_limit]' type='text' value='{esc_attr( $options['results_limit'] )}' />";
}

function dbi_plugin_setting_start_date() {
    $options = get_option( 'dbi_example_plugin_options' );
    echo "<input id='dbi_plugin_setting_start_date' name='dbi_example_plugin_options[start_date]' type='text' value='{esc_attr( $options['start_date'] )}' />";
}
就是这样,然后我们就有了一个设置页面:
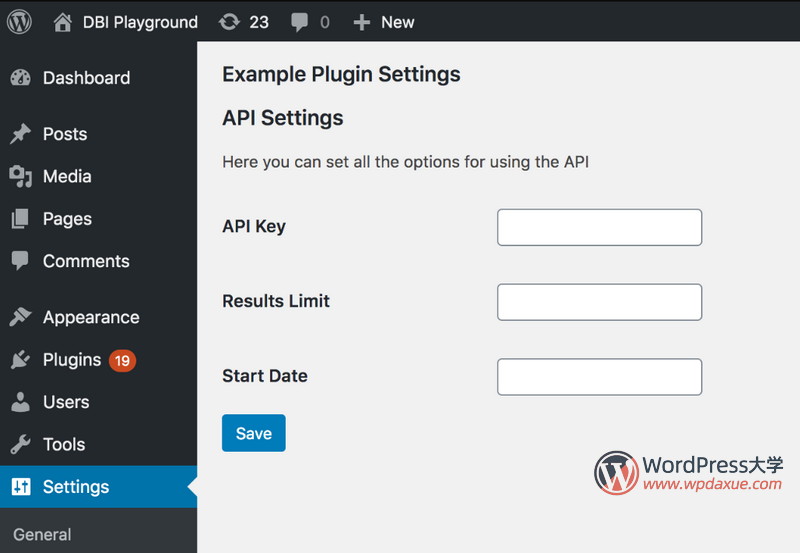
我们要在代码中使用这里设置值的时候,可以通过使用get_option('dbi_example_plugin_options')来获取这些设置的数组数据。
这种方法注册设置选项有些繁杂,有很多字段代码重复,要不断复制和修改,并确保所有内容正确组合在一起。好在有开发者进一步封装了一些类或代码框架,以便大家可以更方便地添加设置:
- https://github.com/tareq1988/wordpress-settings-api-class
- https://github.com/ahmadawais/WP-OOP-Settings-API
- https://github.com/jamesckemp/WordPress-Settings-Framework
自定义字段框架
谈到PHP框架,我想展示一种无需使用WordPress设置API即可创建设置页面的替代方法。在为客户端构建站点时,如果需要设置页面,则默认使用“Advanced Custom Fields ”插件(简称ACF)创建选项页面,并使用它来定义字段。
这是我喜欢使用ACF的众多原因之一:它使复杂的WordPress变得简单。(您是否看过ACF Blocks,它是一个PHP包装器,可在不接触React的情况下为古腾堡编辑器注册块?)
但是,在构建用于分发的插件或主题时,您不能依赖安装了ACF的用户。在这里我推荐“ Carbon Fields ”框架。与ACF不同,Carbon Fields不是插件,通常作为库安装在插件内部,推荐的方法是使用Composer。
提示:如果确实使用Composer在插件中安装Carbon Fields,请记住通过为 Composer软件包的名称空间加上前缀来避免WordPress依赖关系管理。
安装完成后,首先确保引入 Composer 的autoload.php文件,然后使用下面的函数启动Carbon Fields库:
<?php

function dbi_load_carbon_fields() {
    \Carbon_Fields\Carbon_Fields::boot();
}
add_action( 'after_setup_theme', 'dbi_load_carbon_fields' );
要复制我们使用WordPress设置API所做的工作,只需要使用下面简单的代码:
<?php

use Carbon_Fields\Container;
use Carbon_Fields\Field;

function dbi_add_plugin_settings_page() {
    Container::make( 'theme_options', __( 'Example Plugin Page' ) )
        ->set_page_parent( 'options-general.php' )
        ->add_fields( array(
            Field::make( 'text', 'dbi_api_key', 'API Key' )
                ->set_attribute( maxLength, 32 ),
            Field::make( 'text', 'dbi_results_limit', 'Results Limit' )
                ->set_attribute( 'min', 1 )
                ->set_attribute( 'max', 100 )
                ->set_default_value( 10 ),
            Field::make( 'date', 'dbi_start_date', 'Start Date' ),
        ) );
}
add_action( 'carbon_fields_register_fields', 'dbi_add_plugin_settings_page' );
如您所见,该框架使将字段变得更加用容易和友好,例如将默认值、最小值和最大值添加到“结果限制”字段中,以及将“开始日期”字段转换为日期选择器–使用设置API需要一些编码才能实现。

要使用该设置保存的数据,您需要使用以下carbon_get_theme_option()函数:
<?php

$api_key = carbon_get_theme_option( 'dbi_api_key' );
框架可以使用更少的代码来实现功能,让您更专注于编写插件代码,而不是重头开始编写设置部分的代码。
使用代码生成器
另一种比WordPress设置API、以及框架更简便的方法是使用以下WordPress生成器之一:
- WP设置API – http://wpsettingsapi.jeroensormani.com/
- WordPress选项页面生成器https://jeremyhixon.com/tool/wordpress-option-page-generator/
- GenerateWP(高级)https://generatewp.com/settings-page/
让我们使用WordPress选项页面生成器重新创建设置页面。它仅支持少数字段类型。文字、文本域、选择、单选、复选框,没有日期选择器。
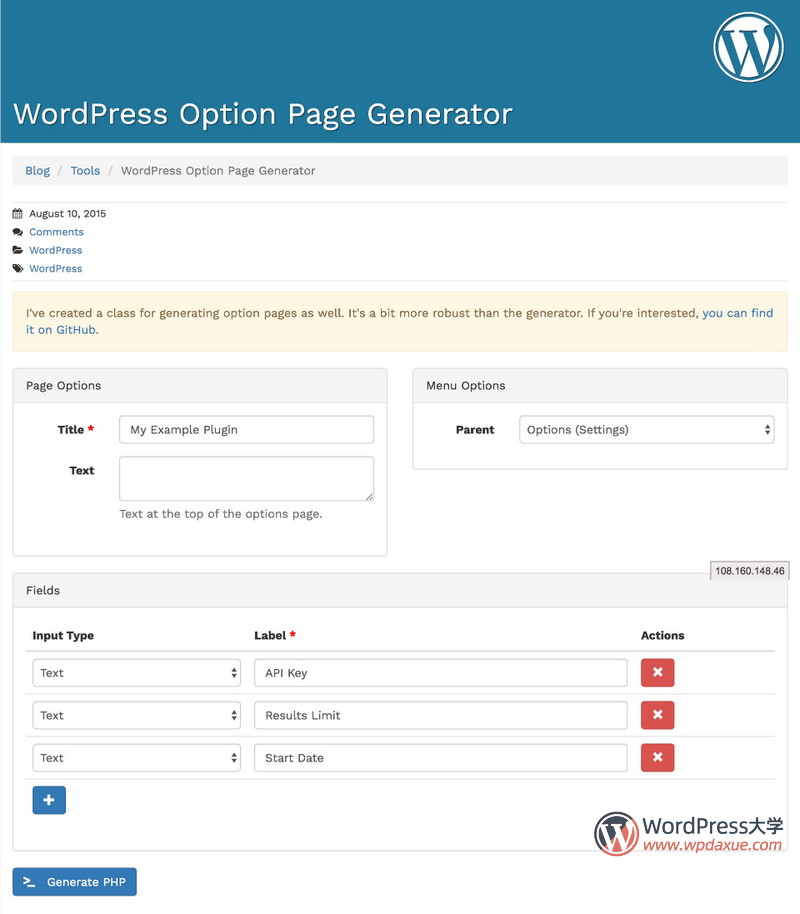
以下是通过生成器生成的代码,可以直接在插件中使用,并以与WordPress设置API相同的方式使用数据:
<?php

/**
 * Generated by the WordPress Option Page generator
 * at http://jeremyhixon.com/wp-tools/option-page/
 */

class MyExamplePlugin {
	private $my_example_plugin_options;

	public function __construct() {
		add_action( 'admin_menu', array( $this, 'my_example_plugin_add_plugin_page' ) );
		add_action( 'admin_init', array( $this, 'my_example_plugin_page_init' ) );
	}

	public function my_example_plugin_add_plugin_page() {
		add_options_page(
			'My Example Plugin', // page_title
			'My Example Plugin', // menu_title
			'manage_options', // capability
			'my-example-plugin', // menu_slug
			array( $this, 'my_example_plugin_create_admin_page' ) // function
		);
	}

	public function my_example_plugin_create_admin_page() {
		$this->my_example_plugin_options = get_option( 'my_example_plugin_option_name' ); ?>

		<div class="wrap">
			<h2>My Example Plugin</h2>
			<p></p>
			<?php settings_errors(); ?>

			<form method="post" action="options.php">
				<?php
					settings_fields( 'my_example_plugin_option_group' );
					do_settings_sections( 'my-example-plugin-admin' );
					submit_button();
				?>
			</form>
		</div>
	<?php }

	public function my_example_plugin_page_init() {
		register_setting(
			'my_example_plugin_option_group', // option_group
			'my_example_plugin_option_name', // option_name
			array( $this, 'my_example_plugin_sanitize' ) // sanitize_callback
		);

		add_settings_section(
			'my_example_plugin_setting_section', // id
			'Settings', // title
			array( $this, 'my_example_plugin_section_info' ), // callback
			'my-example-plugin-admin' // page
		);

		add_settings_field(
			'api_key_0', // id
			'API Key', // title
			array( $this, 'api_key_0_callback' ), // callback
			'my-example-plugin-admin', // page
			'my_example_plugin_setting_section' // section
		);

		add_settings_field(
			'results_limit_1', // id
			'Results Limit', // title
			array( $this, 'results_limit_1_callback' ), // callback
			'my-example-plugin-admin', // page
			'my_example_plugin_setting_section' // section
		);

		add_settings_field(
			'start_date_2', // id
			'Start Date', // title
			array( $this, 'start_date_2_callback' ), // callback
			'my-example-plugin-admin', // page
			'my_example_plugin_setting_section' // section
		);
	}

	public function my_example_plugin_sanitize($input) {
		$sanitary_values = array();
		if ( isset( $input['api_key_0'] ) ) {
			$sanitary_values['api_key_0'] = sanitize_text_field( $input['api_key_0'] );
		}

		if ( isset( $input['results_limit_1'] ) ) {
			$sanitary_values['results_limit_1'] = sanitize_text_field( $input['results_limit_1'] );
		}

		if ( isset( $input['start_date_2'] ) ) {
			$sanitary_values['start_date_2'] = sanitize_text_field( $input['start_date_2'] );
		}

		return $sanitary_values;
	}

	public function my_example_plugin_section_info() {

	}

	public function api_key_0_callback() {
		printf(
			'<input class="regular-text" type="text" name="my_example_plugin_option_name[api_key_0]" id="api_key_0" value="%s">',
			isset( $this->my_example_plugin_options['api_key_0'] ) ? esc_attr( $this->my_example_plugin_options['api_key_0']) : ''
		);
	}

	public function results_limit_1_callback() {
		printf(
			'<input class="regular-text" type="text" name="my_example_plugin_option_name[results_limit_1]" id="results_limit_1" value="%s">',
			isset( $this->my_example_plugin_options['results_limit_1'] ) ? esc_attr( $this->my_example_plugin_options['results_limit_1']) : ''
		);
	}

	public function start_date_2_callback() {
		printf(
			'<input class="regular-text" type="text" name="my_example_plugin_option_name[start_date_2]" id="start_date_2" value="%s">',
			isset( $this->my_example_plugin_options['start_date_2'] ) ? esc_attr( $this->my_example_plugin_options['start_date_2']) : ''
		);
	}

}
if ( is_admin() )
	$my_example_plugin = new MyExamplePlugin();

/*
 * Retrieve this value with:
 * $my_example_plugin_options = get_option( 'my_example_plugin_option_name' ); // Array of All Options
 * $api_key_0 = $my_example_plugin_options['api_key_0']; // API Key
 * $results_limit_1 = $my_example_plugin_options['results_limit_1']; // Results Limit
 * $start_date_2 = $my_example_plugin_options['start_date_2']; // Start Date
 */
生成器是一个非常有用的工具,可通过一个现成的设置页面启动您的插件,无需进行大量编码即可对其进行调整。它们还可以帮助您学习代码的工作原理,分离现有代码并查看它们如何组合在一起。但是,从长远来看,对于需要对设置代码进行大量更改的插件来说,它们可能不是最佳选择。
使用REST API
WordPress REST API的许多重要用途之一就是改善您的插件或主题设置屏幕。
在《使用WordPress REST API创建WordPress设置页面》一文中,Josh Pollock深入探讨了如何使用REST API和jQuery 创建设置页面。我不会用这种技术来重新创建设置页面,因为本文是一篇非常详尽的教程。
REST API可以提供优于传统 admin-ajax.php 请求的性能优势,再加上单击“保存”无需刷新页面即可在后台保存表单设置,这种方法比WordPress设置API更友好。
Josh指出,随着添加设置和表单变得越来越复杂,“使用jQuery将会做得越来越多,这很难管理而且会更简单,并且如果您使用VueJS或React可以提供更好的用户体验” ,这使我很好地了解了下一个方法,即VueJS支持的设置页面。
使用VueJS
在去年收购 WP User Manager 插件的过程中,我调查了代码库以了解其编写方式,并发现设置页面由使用REST API和VueJS的软件包 – wp-optionskit 提供支持 :

该软件包可随Composer一起安装,并使用此处的代码实例化和配置设置页面。这是我们的示例设置页面的外观:
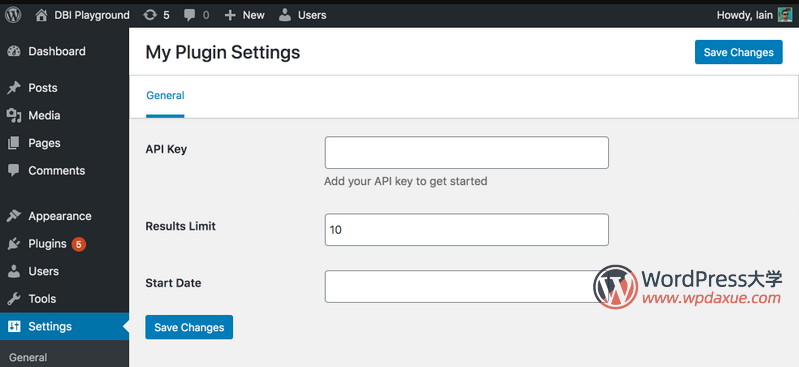
我喜欢这种方法的地方在于,它允许您仅通过在PHP中配置数据数组来生成具有多个选项卡和小节的复杂设置页面。与其他方法一样,设置数据存储在选项表的一条记录中,因此这是一种检索和使用保存的数据的熟悉方法。
等一下,VueJS?WordPress不会全力投入React吗?
谈谈React
尽管WordPress采用了 React 来构建WordPress编辑器界面(WooCommerce甚至使用 React 重构了后台界面),我还没有看到任何以 React 为基础的框架,用于创建插件的设置页面。但是,正如我们在wp-optionskit中看到的那样,使用REST API为在WordPress管理员中广泛使用VueJS或React打开了大门。
总结
与万物发展一样,实现同一事物的方法有很多,而您为一个项目选择的方法可能与另一个项目不同。目前,我个人最喜欢的是wp-optionskit,因为它允许多个设置选项卡和小节,并且在保存时提供更好的用户体验。
您用于为插件创建WordPress设置页面的方法是什么?欢迎在文章中评论告诉我们!
原文出自: https://deliciousbrains.com/create-wordpress-plugin-settings-page/ ,由 WordPress大学 翻译整理。